Modding Guide Single Page#
This is the single page version, click the Multi-Page Guide if you want the more organized version instead.
If you would prefer to view this guide all in one page, there is the Modding Guide Single Page for your convenience.
1. Requirements#
Approximately 6GB of free space. 1GB if you’re not using P3HD.
- Once Aemulus is installed:
Note
This doc is in the process of being migrated from https://gamebanana.com/tuts/15959
If you run into any problems, be sure to check Troubleshooting. I’m also available in the P3HD Discord Server along with a few other good people that will be happy to help, just ask for help in #p3hd-help.
CEP Is not compatible with P3HD, thus it is recommended to start from scratch if you want P3HD support. If you want to use CEP, the guide to do so is here.
This guide will assume you’re using windows, as Aemulus only runs under windows. For setting up mods under MacOS or for Linux/Steam Deck there will be an Extras section at the end of this guide. Do note that a Windows computer or VM is still required to setup your mods at the time of this writing.
You also must have a clean Persona 3 FES USA ISO with CRC 94A82AAA, any other ISOs are not supported, and directions for making it work will not be provided as it can cause other issues.
If you’re playing on hardware, the contents of this guide will not be usable as Aemulus does not support running under hardware. For information on setting up mods to work on real hardware, please see Nobodyinparticular’s (Tutorial) Playing a Modded ISO on PS2.
At the time of this writing, launching the game is not supported through Aemulus due to a number of issues it has with mods and texture replacements. This guide will not cover launching the game through Aemulus, and instead will show you how to launch it through Steam and PCSX2.
Some images may be difficult to see due to limited width, if you right click, then select “Open Image in a New Tab” you can view the full size image.
Lastly, any links in this guide it’s recommended you open them up in a new tab so you can keep the guide open. You can either middle click, or right click and click “Open Link in a New Tab.”
PCSX2 v1.7.5397 is the last mod supported build at the moment. Please do not use the latest until this is resolved.
1.1. Downloading PCSX2, P3HD, Aemulus, and 7-Zip#
2. PCSX2#
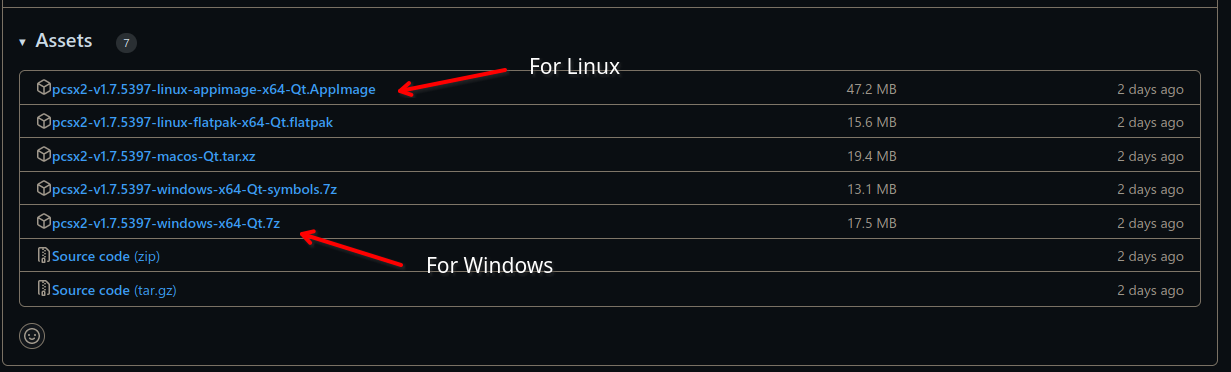
Click “Latest Nightly”
Then click the version that matches your OS. For most people this will be the first option for Windows. For Linux you will want the one ending in Appimage.
3. Persona 3 FES: HD Overhaul#
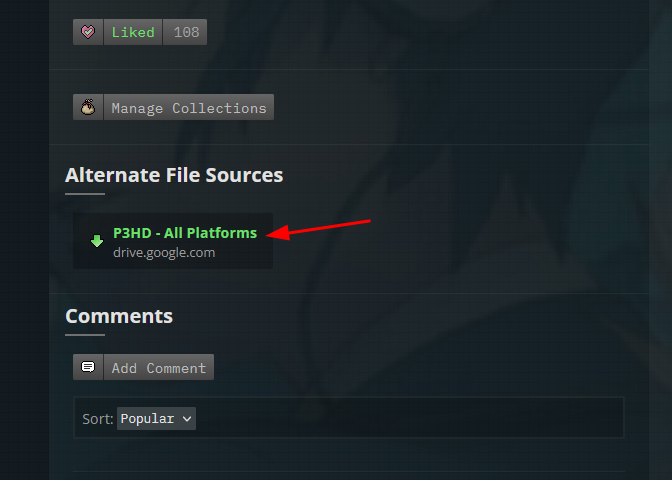
Click Persona 3 HD under Requirements, or click here.
Scroll down to Alternate File Sources.
Click “P3HD – All Platforms.”
4. Aemulus#
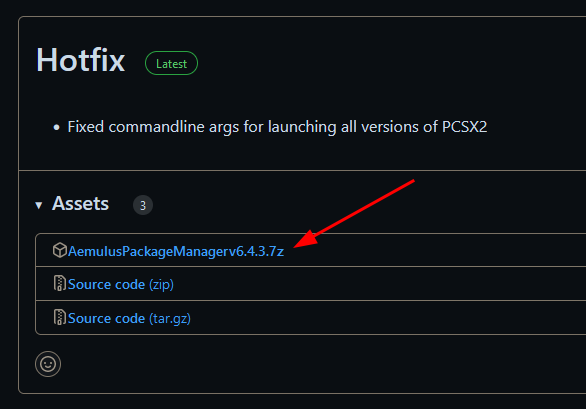
Click Latest Aemulus Release under Requirements, or click here.
Find the first “Assets” header and click to expand it
Then grab the item named “AemulusPackageManagervx.x.x.7z.”

5. 7-Zip#
Click 7-Zip under Requirements, or click here.
Select the 64-bit Windows x64 “Download” option.

5.1. Installing 7-Zip, PCSX2, and Aemulus#
6. Folders#
Note
If you’re running on linux, any instance of “C:\Emulation” can be replaced with “~/Documents/P3FMods” where ~ refers to your home folder.
1. Setup a folder that is outside your user profile. Recommendation is to use something like C:\Emulation or C:\Persona, whichever is more convenient for you.
a. Open up windows file explorer, click “This PC” (In other languages this will be named different, in Japanese it’s just “PC”)
b. Navigate to your “C:\” Drive (or whichever other drive you want to set this up at)
c. Right click an empty space, hover over “New”, then click folder
d. Name the folder Persona, or Emulation, or whatever else will make it easy to identify for you.


7. 7-zip#
2. Install 7-Zip, you should have the following files in your downloads folder. Open up a new file explorer window (Ctrl+N in the previous window will work for this) and navigate to “Downloads” using the quick access bar at the left

a. Double click the 7z exe file, the icon will be black and white, and then follow the prompts to install.
8. Aemulus#
- .. note::
For installing Aemulus under Linux, you will skip this section and instead follow the directions at Installing Aemulus on Linux.
3. Extract the contents of each of the packages we downloaded earlier. If 7zip is associated as the default file handler for 7z files, you should be able to double click them to open them up. If it is not and the icon shows as a blank white file icon instead, you will need to right click, hover over “7-Zip”, then click “Open archive.”
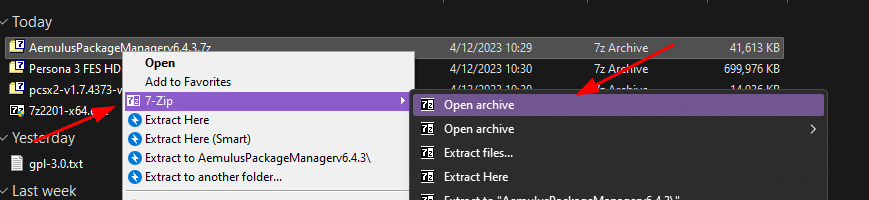
a. Open up the Aemulus 7-zip package, and drag and drop the contents into your C:\Emulation folder.

b. A few popups will come up during the extraction process, followed by a final explorer copy pop up. Let these do their thing, do not interrupt them or hit cancel.
9. PCSX2#
Note
For Linux, I recommend using TheAssassin/AppImageLauncher which will allow you to install your AppImages. Beyond that, an appimage is just a self contained binary, move it somewhere you can find it (or integrate it), no further steps required. Skip to step d.

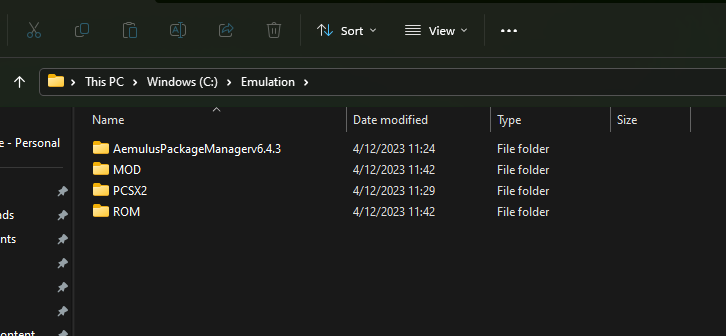
c. Make a folder for PCSX2 in your C:\Emulation folder by right clicking an empty area, hovering over “New”, and clicking “Folder.” Then open up the newly made PCSX2 folder


d. Make another folder called ROM (this is where your Persona 3 FES.iso will go) using the same steps as above.
e. Make one last folder called MOD (this is where your ELF will go along with your Aemulus mod files using the same steps as above.)
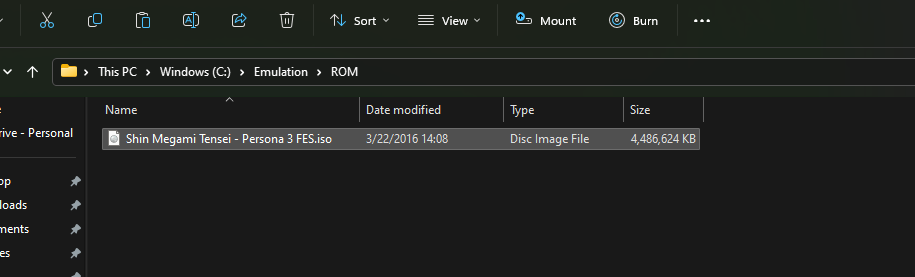
f. Copy over your legally obtained Persona 3 FES.iso into the ROM folder now.
g. Next we’re going to grab the ELF file. Right click your Persona 3 FES iso file, hover over “7-Zip”, click “Open archive.”

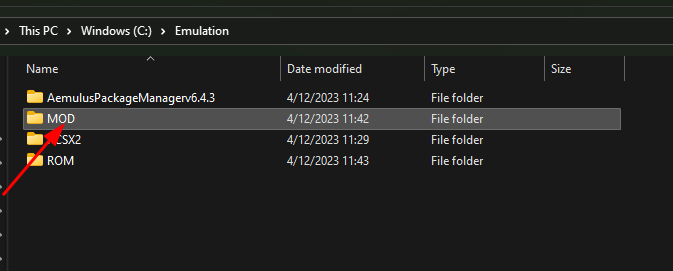
h. Navigate back to your Emulation folder by clicking Emulation in your address bar, then double click MOD to open it.

i. In 7-Zip File Manager, select the “SLUS_216.21” file, then drag and drop it into your MOD folder.


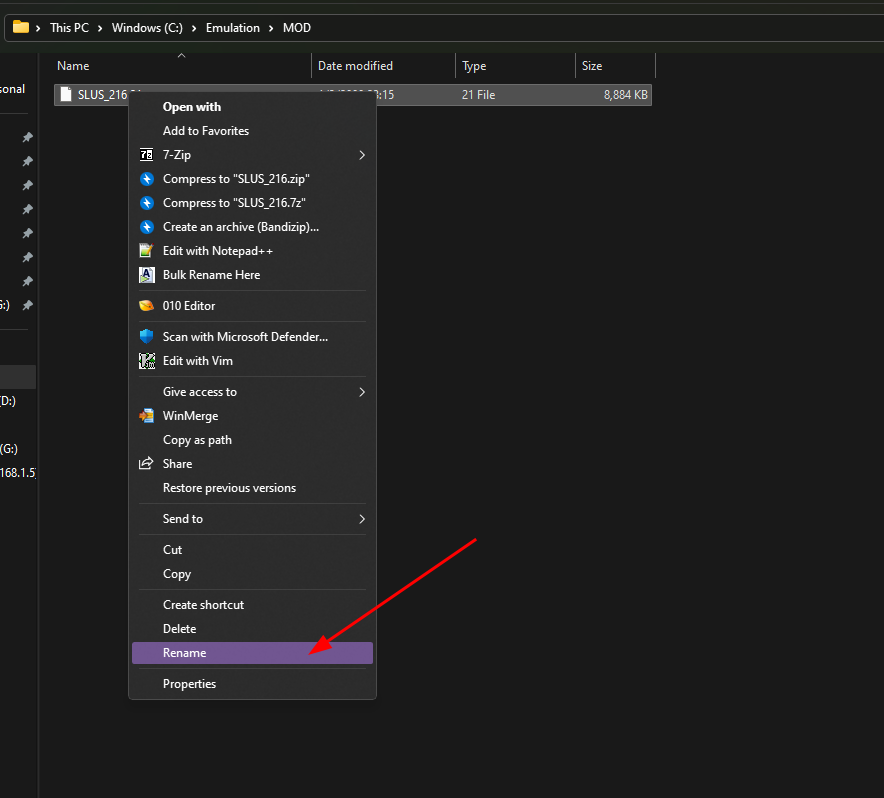
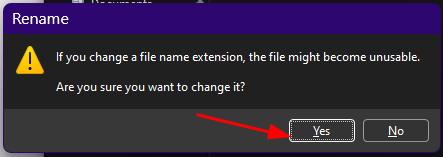
j. Rename your “SLUS_216.21” file to something like Persona 3 FES.ELF or whatever else you want it to be called, as long as it ends in .ELF. Right click the file, then click Rename. Then type the name Persona 3 FES.ELF then hit enter. Finally it’ll give you a prompt asking if you want to change the file extension. Click “Yes.” | “Um, Miss Kitty, CEP says you shouldn’t rename the ELF.” That’s cool, don’t do it if you don’t want to - just tack .ELF to the end of the file, it makes no difference other than making your Discord Rich Presence not look stupid in PCSX2 if you choose to enable that, and also makes the game recognizable in your PCSX2 game list.


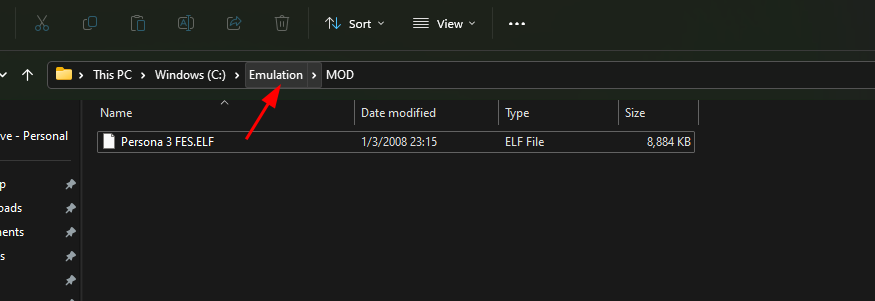
k. Navigate back to your C:\Emulation folder by clicking “Emulation” in the address bar at the top.
l. Open up the PCSX2 7z file in your downloads folder in 7-zip, either by double clicking or right click, hover over “7-Zip”, then click “Open Archive.”
m. Select all files in the 7-Zip file manager (Ctrl-A is the easiest way to do this). Then drag the contents into the PCSX2 folder.


n. Open “pcsx2-qt.exe” once to populate all of your files.
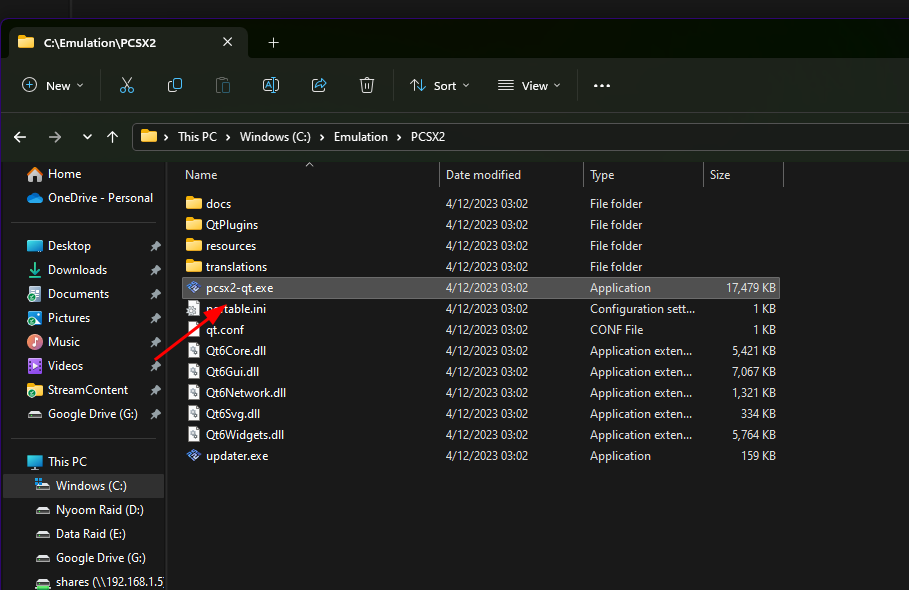

o. Copy over your legally obtained bios into the bios folder. We’ll cover making sure your BIOS is in pcsx2 correctly later. For now, go ahead and close pcsx2.
9.1. Installing Persona 3 FES: HD Overhaul#
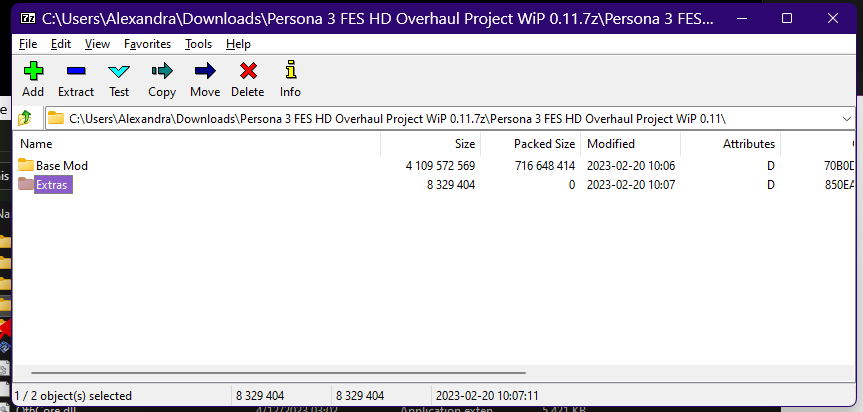
1. Open up the Persona 3 FES HD Overhaul 7z file, either by double clicking, or right click, hover over “7-Zip”, and “Open archive.”
a. In the 7-zip file manager, navigate to the following. Each folder is opened with a double click. “Persona 3 FES HD Overhaul” > “Base Mod” > “PCSX2 DIR”


Note
Under Linux you will want to drag and drop the textures from P3HD to “~/.config/PCSX2” instead
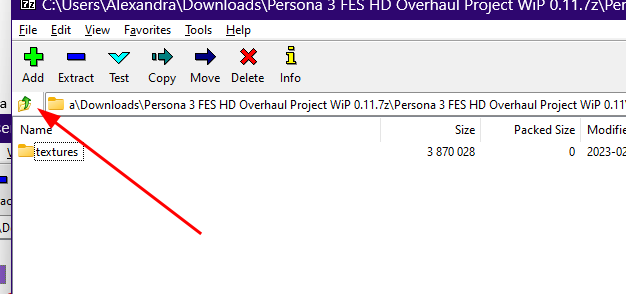
b. Inside the folder you will have one folder named “textures.” Drag and drop that into your PCSX2 directory that you should still have open from earlier.


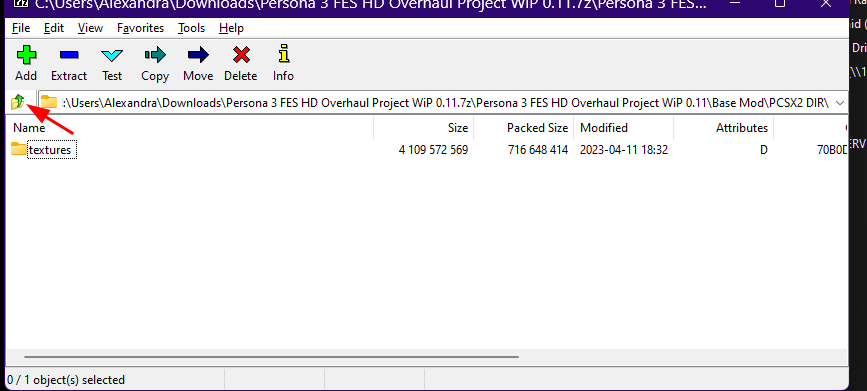
c. Optional: Click the up button in 7-Zip File Manager twice to get back to the folder that has “Base Mod” / “Extras”


9.2. Setting up Aemulus for Mods#
Note
If on Linux, replace instances of C:\Emulation with ~/Documents/P3FMods where ~ refers to your home folder. If for some reason you haven’t installed aemulus, go to Installing Aemulus on Linux. Replace instances of opening the Aemulus exe with opening up Aemulus from your launcher.
1. Navigate back to your C:\Emulation (Or whatever you named it) folder you made earlier using then double click your Aemulus folder.
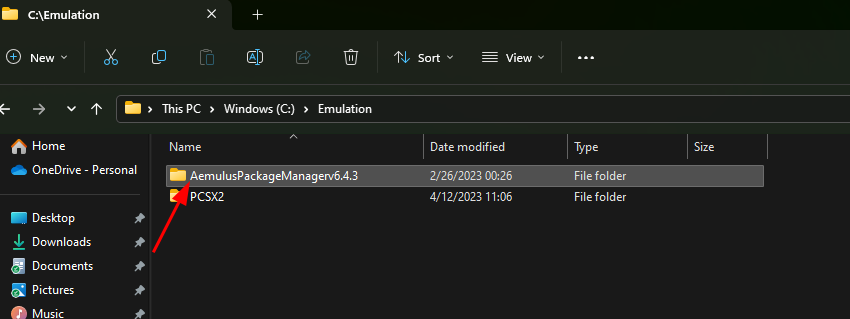
2. Double click “AemulusPackageManager.exe” to open it.

3. When you first open it, it will default to “Persona 4 Golden.” Click the game icon and change it to “Persona 3 FES.”


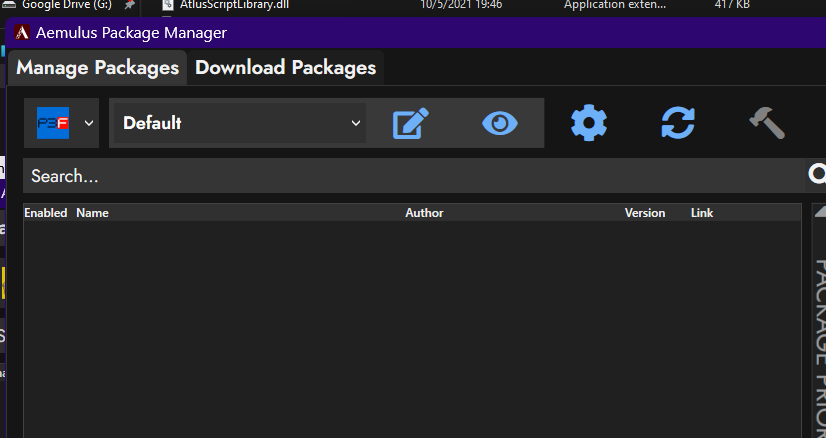
4. Click the gear icon to open the settings screen.

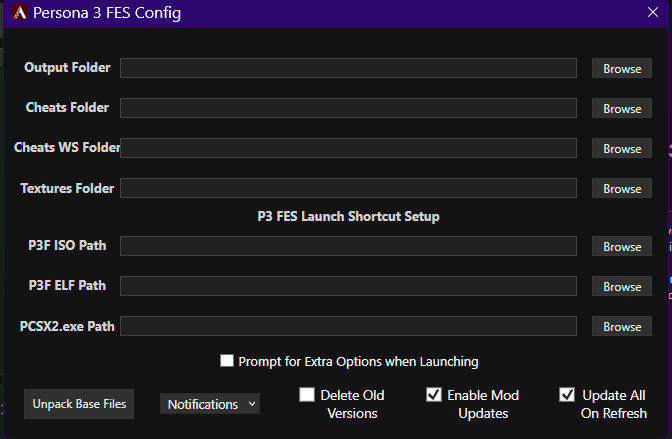
5. To ensure your paths are completely accurate, this guide recommends using the “Browse” button for each line, the paths this guide will use will be included at the end of this section, but do note if you changed the name of your Emulation, MOD, ROM, or PCSX2 folders, or set this up on a different drive, your paths will differ slightly.

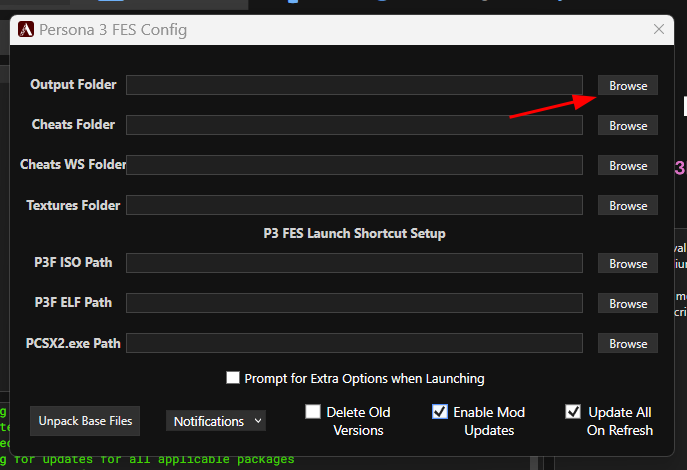
6. Setting up your “Output” folder. Click “Browse”, in the window that pops up
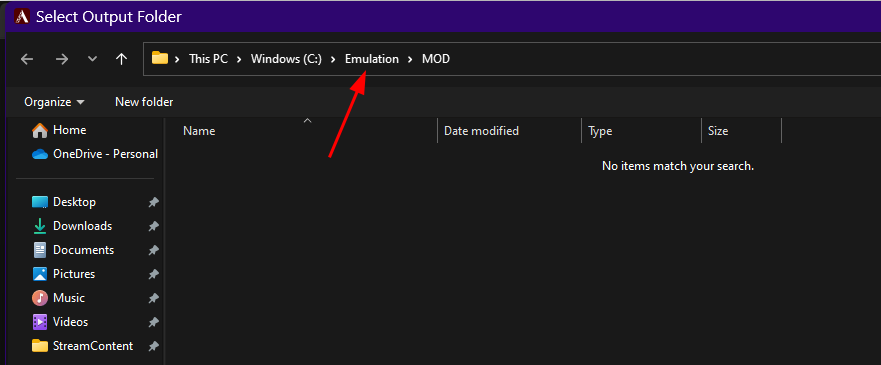
a. click “This PC”, then double click your C drive
b. then double click Emulation, then double click MOD
c. then you’ll have an empty folder, which you’ll click “Select Folder” at the bottom right.


Note
If on Linux, PCSX2 stores Cheats and Textures in “~/.config/PCSX2”. Replace instances of Cheats and Textures path with “Z:home<username>.configPCSX2Cheats” and “Z:home<username>.configPCSX2TexturesSLUS-21621replacements”.
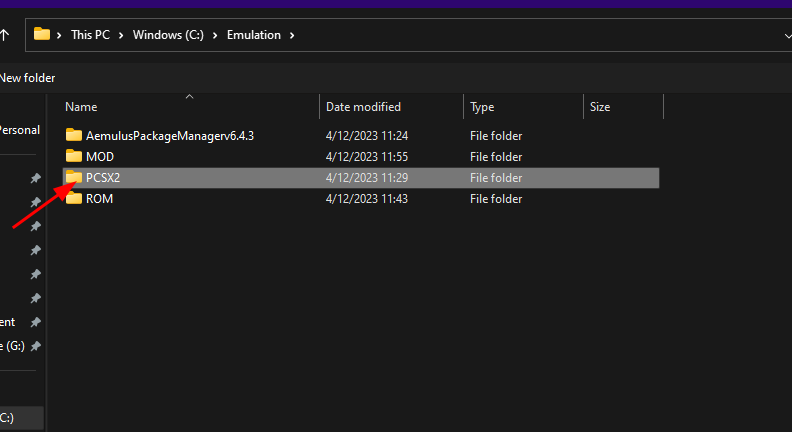
7. Setting up the “Cheats” and “Cheats WS” folder, you’ll click “Browse” next to cheats. Since your C:\Emulation\MOD folder is the last one selected, it will automatically open to that path. Note: Cheats_WS no longer exists in new pcsx2 installs.
a. Click emulation at the top,
b. Then double click PCSX2.
c. Double click cheats.
d. Then click Select Folder.
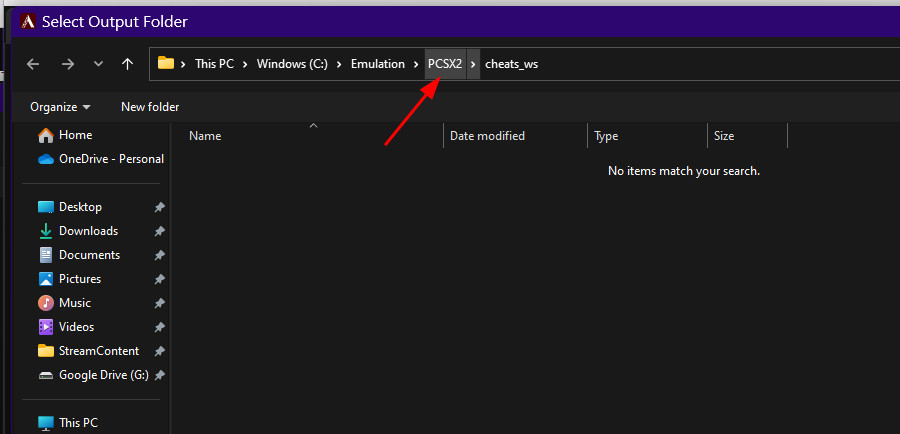
e. Repeat these steps for Cheats WS by clicking browse.
f. Then click the PCSX2 Button up top.
g. Then click the cheats_ws folder.
h. Then click “Select folder.”

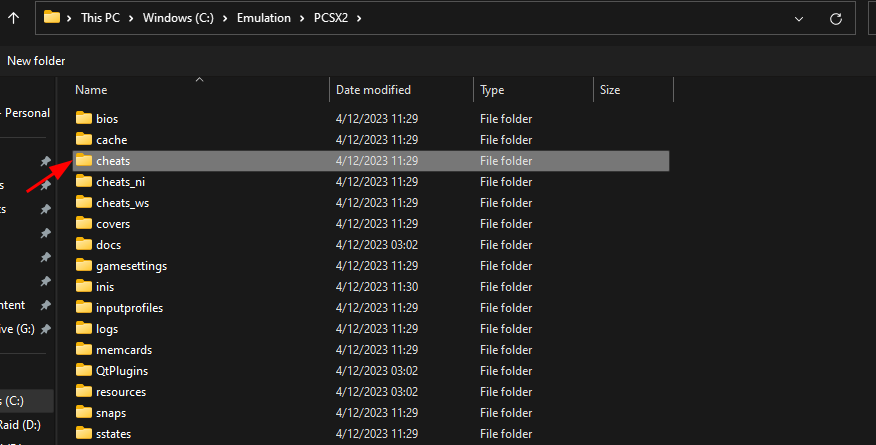
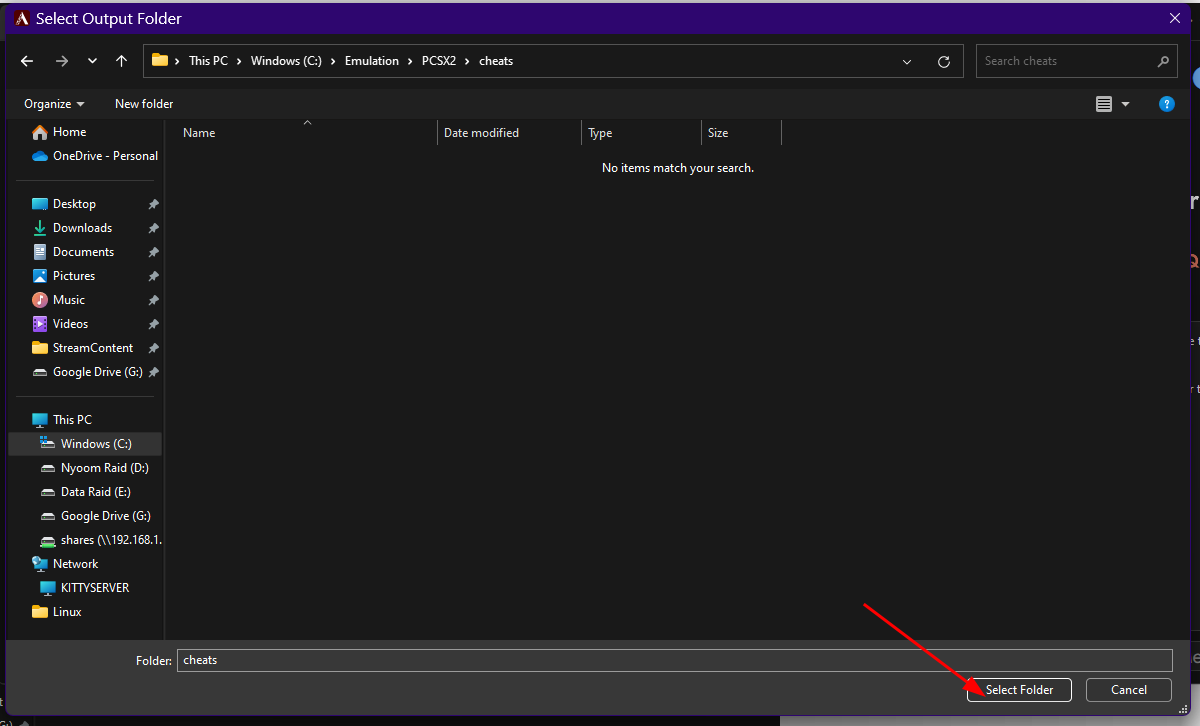
8. Next we’ll set the textures folder path. If you’re not using P3HD for whatever reason, this step may be skipped.
a. Click “Browse” next to the “Textures” line.
b. Click PCSX2 at the top.
c. Double click the textures folder.
d. Double click SLUS-21621 (if it doesn’t exist, right click > new > folder and give it that name, then double click it – if you had to do this step, you should probably go back and follow the Persona 3 HD Overhaul steps as the folder was made during that process).
e. Then double click replacements.
f. Then click “Select Folder.”

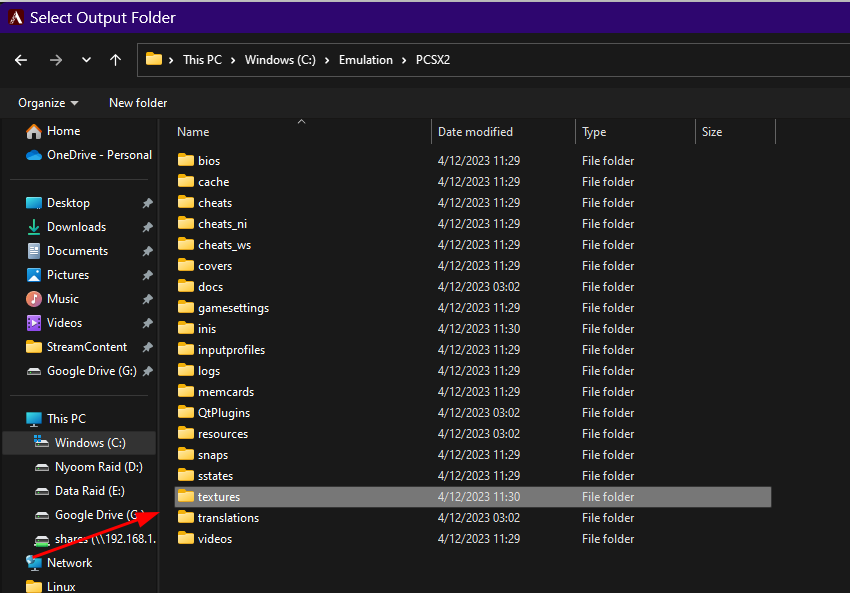

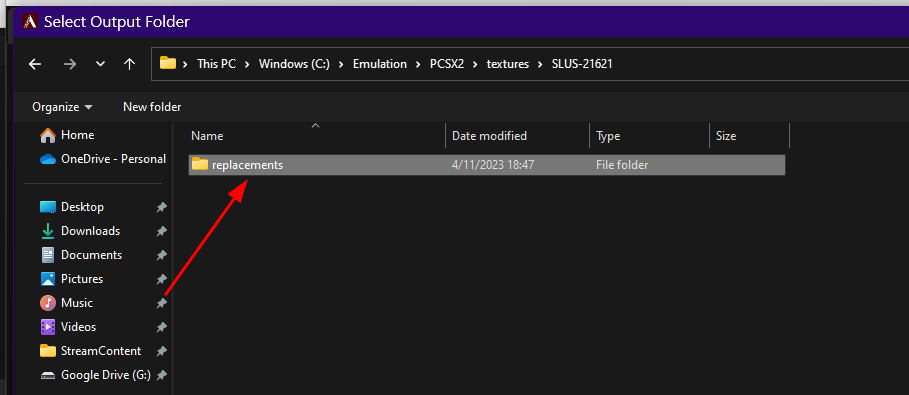

9. Next we’re going to select the “PCSX2.exe path” (this is technically optional but included for completeness sake). This step is done out of order to make it easier to follow the directory structures.
a. Click “Browse” on the “PCSX2.exe” line.
b. Then click the PCSX2 button in the address bar at the top.
c. Then double click your pcsx2-qt.exe (In some cases it may be named pcsx2-qt-av2.exe instead). Please be aware that Aemulus launching is busted at the time of this writing. Do not use the launch option via Aemulus. Instead either launch the game through steam, create your own shortcut to launch the game, or start the game via PCSX2.
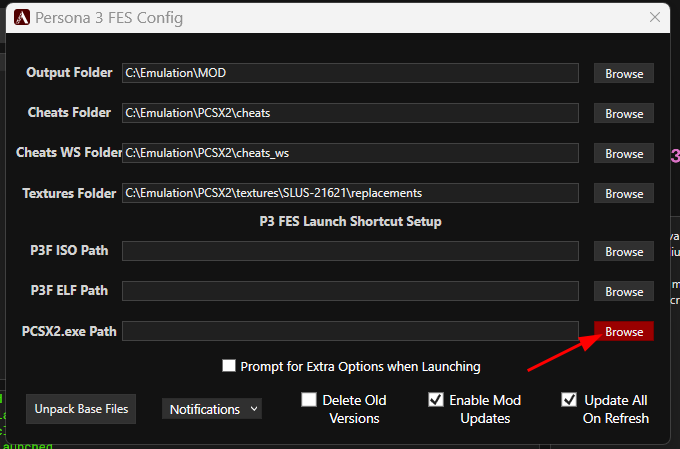
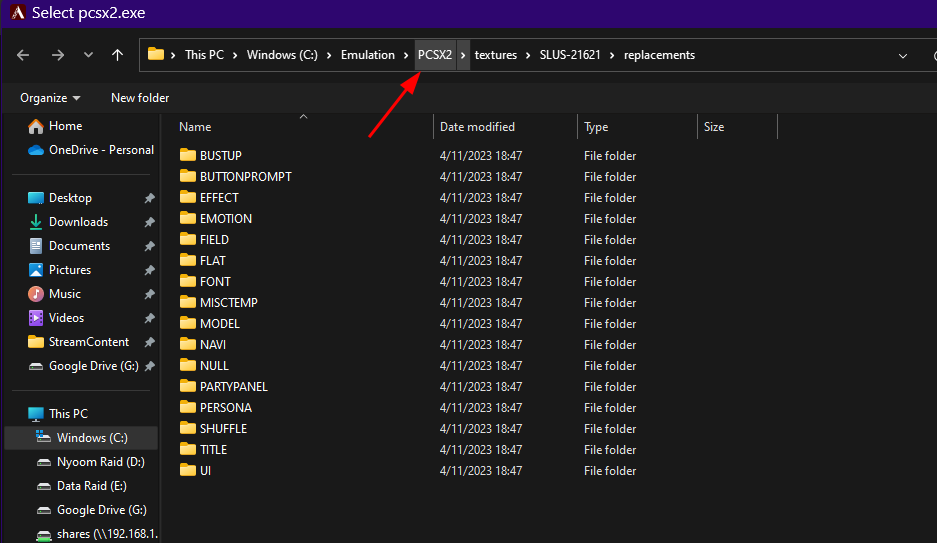
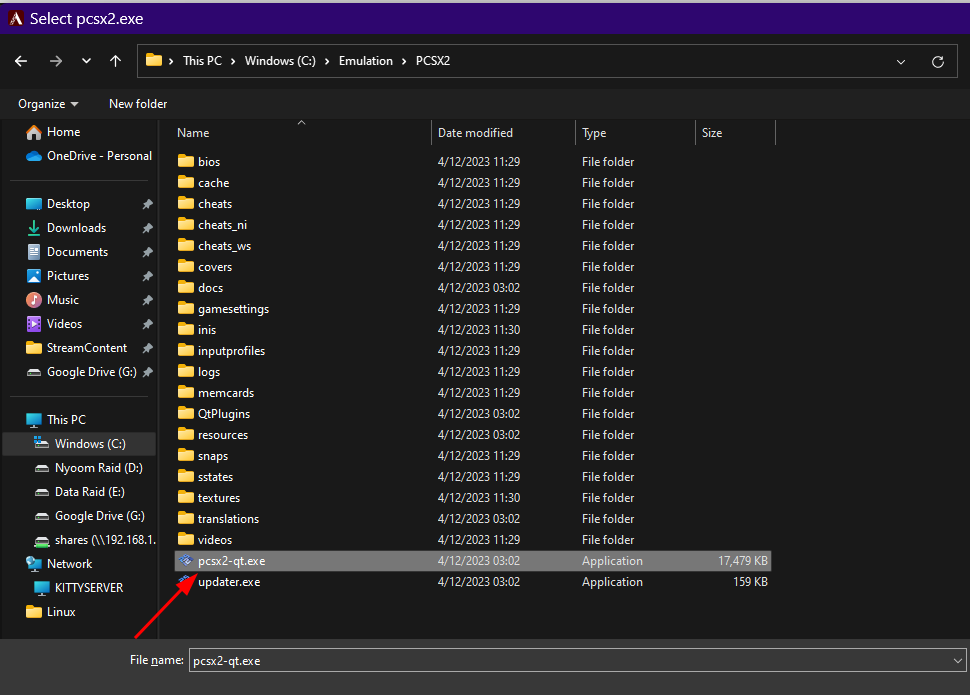
10. Next we will be selecting your “P3F ISO path.”
a. Click “Browse” on the “P3F ISO” path line.
b. Then click Emulation in the address bar at the top.
c. Then double click ROM.
d. Then double click your Persona 3 FES.iso file.
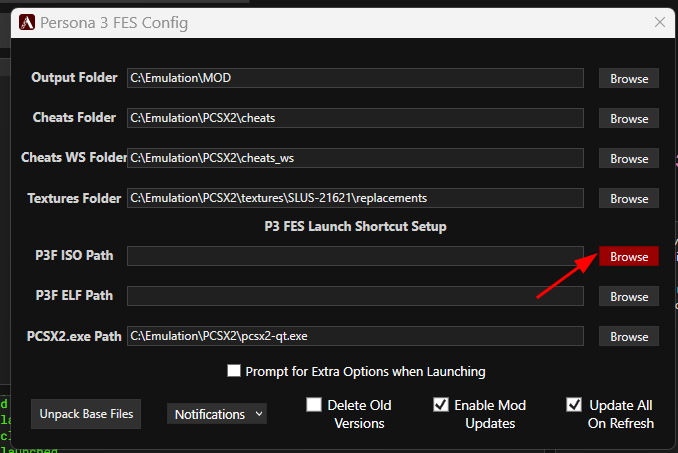


11. Next, we’ll set the ELF path.
a. Click “Browse” on the “P3F ELF path” line.
b. Click emulation in the address bar at the top.
c. Then double click the MOD folder.
d. Then double click your Persona 3 FES.ELF file.
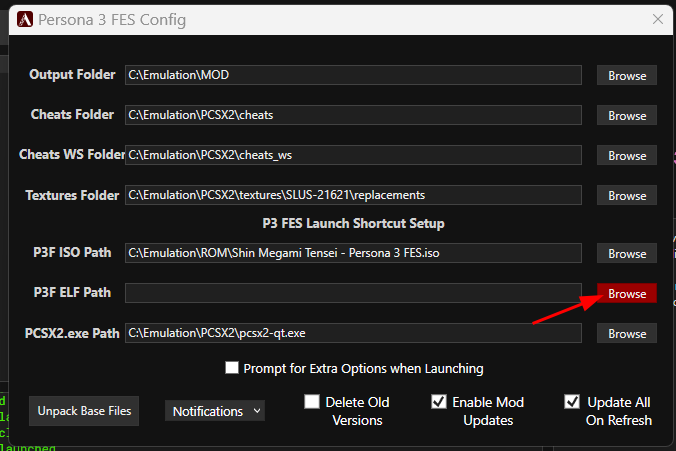
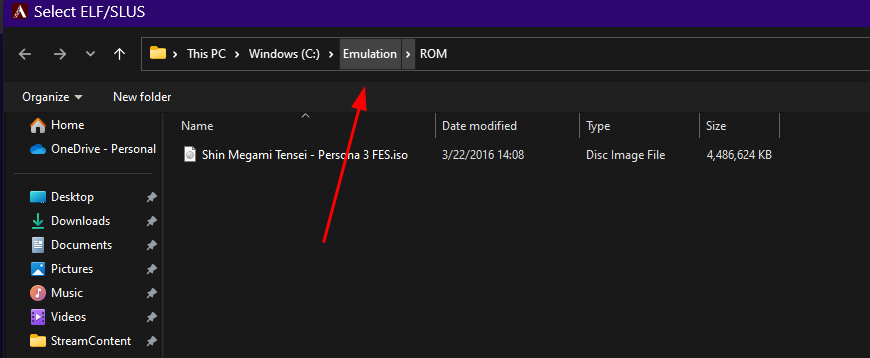
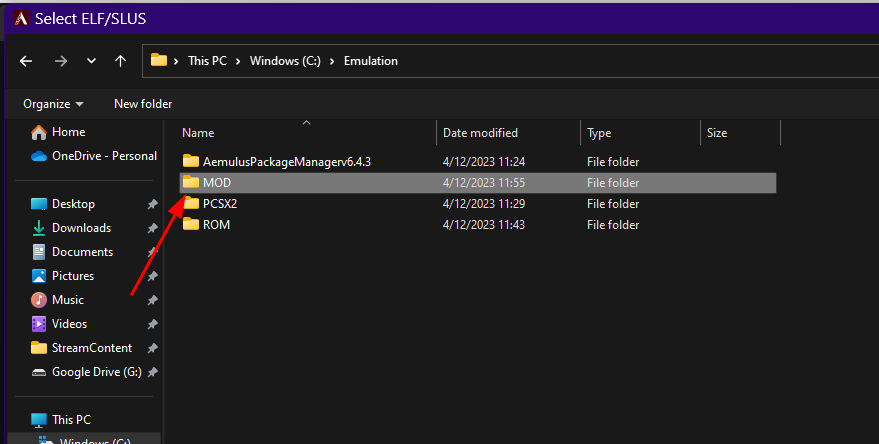

12. Next, in Aemulus settings, click the “Delete Old Versions” checkbox so that it is checked. Any time a mod is updated, the old package is removed. (Explanation: Aemulus caches old versions of packages but hides them in the interface, this will reduce the amount of space required for your install. Anytime there is a mod update, it is worth checking the mod page prior to updating in the event of any breaking issues.)

13. Next, we’re going to unpack the base files. The reason for doing this is to enable an Aemulus feature called BIN merging. This effectively increases mod cross compatibility when utilized. Click the “Unpack Base Files” button in the settings screen.
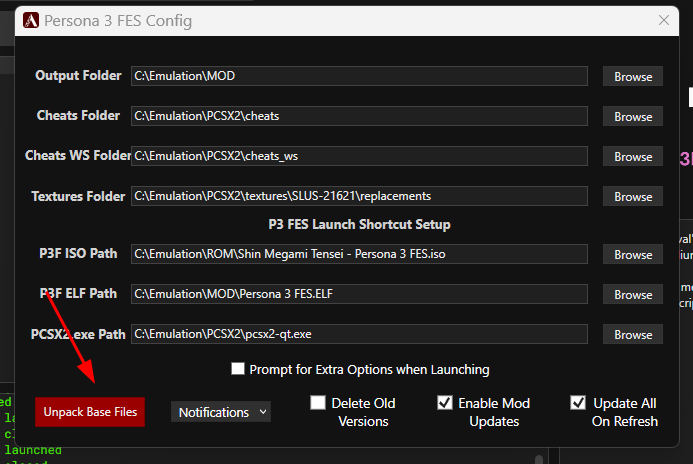
14. The application will seemingly lock up, but in the log you’ll see some output from it showing that its extracting files. Just hang tight and wait for it to finish.

15. Once done Aemulus will give you a window saying “Finished Unpacking” click “OK” on that and now we can move to installing mods.

10. Oh no I got a prequisites error when unpacking base files#
10.1. Installing Mods#
Note
These install methods also work with Linux.
11. One-Click Method#
1. Navigate to the mod page on Gamebanana.
2. Scroll down to the “Files” section
3. Click the big “Aemulus Package Manager 1-CLICK INSTALL” link

4. Aemulus should open up and ask if you want to install, click “Yes.”

5. After it downloads, it’ll auto add the mod to your list

6. Lastly, click the checkbox to enable the mod.

7. Rinse and repeat for any other mods you want to add.
12. Manual Method#
1. Navigate to the mod page on the GameBanana website. In this case it will be Simply Better FMVs.
2. Scroll down until you get to the “Files” section
3. Click “Download” if you’re wanting to download a package that is hosted by GameBanana, or click the name of an Alternate File Source, in the example picture we’ll use “SBFMV English Classic Subs.”

4. If the file is on GameBanana, it will auto-start the download, if the file is on google drive it’ll take you to a preview page which will give you a link to click “Download”. If the file is too large, it’ll take you to another page that says it couldn’t scan for viruses. You’ll want to click “Download anyway.”


5. Once your download completes, open file explorer and navigate to your downloads folder (You can access it from Quick Access at the left), then drag and drop the file onto the Aemulus window to install it.


6. If the file is large, Aemulus may lock up for a moment while it processes the archive. Be patient. Once it’s installed it will be automatically added to your list.

7. Lastly, click the checkbox to enable the mod.

8. Rinse and repeat for any other mods you want to add.
13. Aemulus Mod Priorties#
14. Building your mods#
1. Once you’re happy with the mods you’ve installed. Click the hammer at the top right.

2. Aemulus will confirm if you want to delete the contents of your output directory. Click “Yes.”

3. A bunch of stuff will show up in the log below, let it run. Aemulus may appear to be unresponsive at times, just be patient.

4. Once done, Aemulus will say “Finished Building!” Click “OK” and you’re done with Aemulus until the next time you want to add/change/update mods. Feel free to close it out until you need it again.

14.1. PCSX2 Setup#
1. Re-use an open File Explorer window or open a new one, and navigate to C:\Emulation\PCSX2 or whatever you named those two folders earlier.


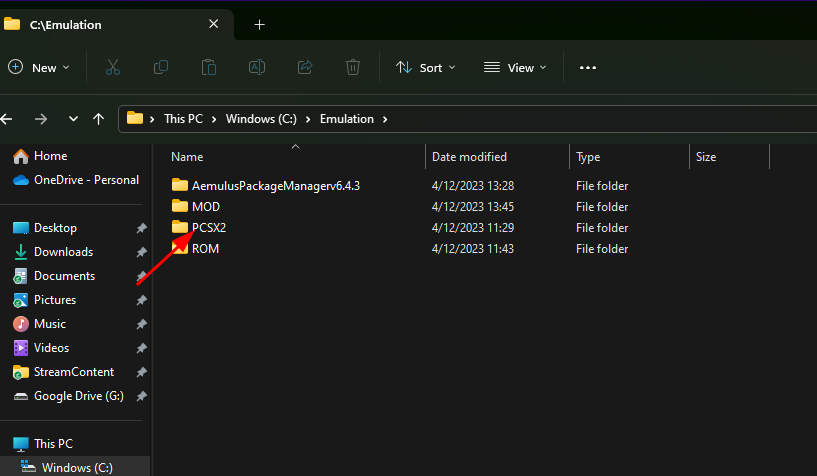
2. Download the HostFS cheat here. (There is a 16:9 patch included in the link as well.)
3. Open another file explorer window and navigate to your downloads folder by clicking downloads under the Quick Access area.

4. In the PCSX2 folder, open the cheats folder

5. Drag and drop the HostFS and Wide (if you downloaded wide!) cheats into the PCSX2 cheats directory we just opened.
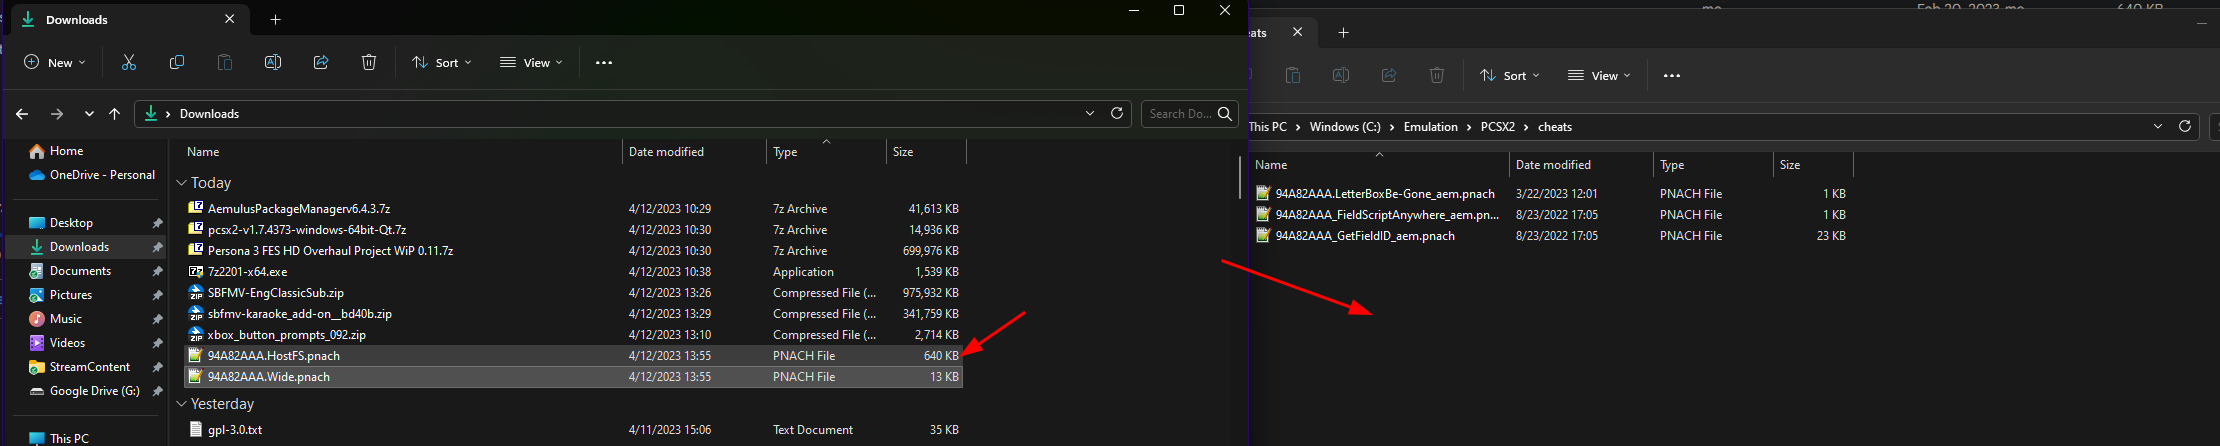
6. Don’t be alarmed if you see there are already cheats in the folder, as Aemulus put these in for you when you built your mods earlier. When finished your cheats folder should look similar to this, you may have more cheats depending on the mods you have installed.

7. Navigate back to your PCSX2 folder by clicking PCSX2 in the address bar.

8. Open the pcsx2-qt.exe (or pcsx2-qt-av2.exe or for Linux pcsx2-v1.7.5397-linux-appimage-x64-Qt.AppImage) file.

9. Once PCSX2 is open click “Add Game Directory…”, if you’re using a previously used install of PCSX2, and you have a populated list, right click and click “Add Search Directory…”
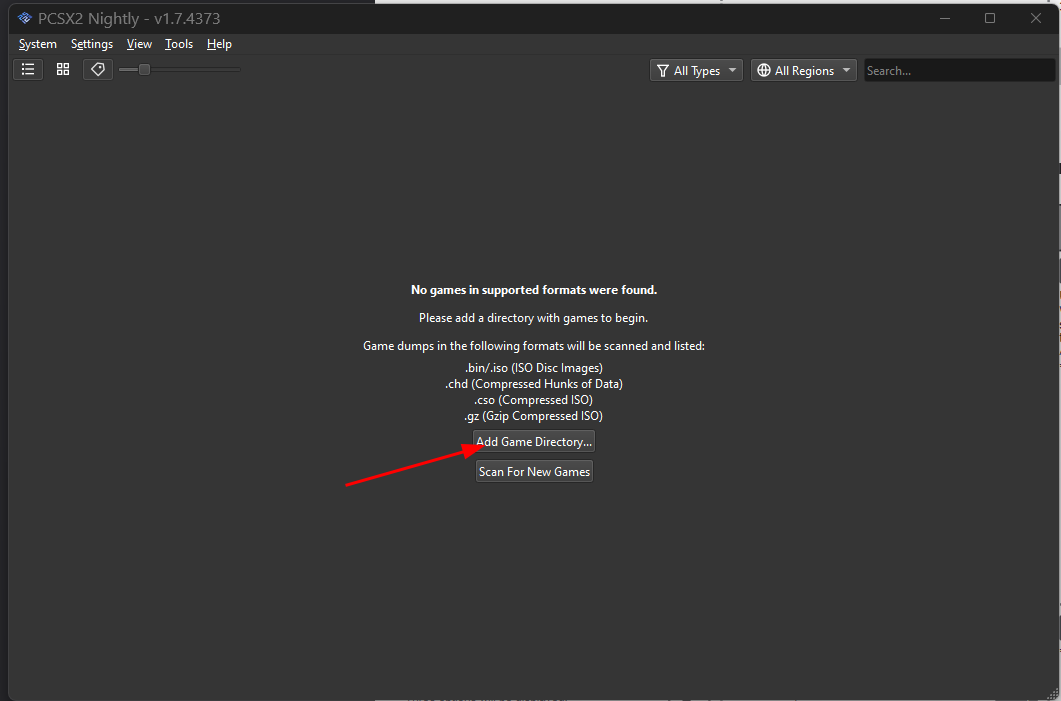

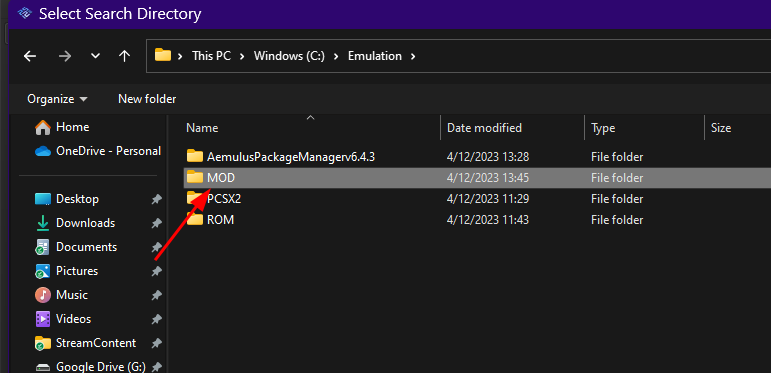
10. Click the emulation button at the top of the address bar, then click MOD, then click “Select Folder.”


11. You’ll get a popup asking if you want to search recursively. Just click “No” for this one.

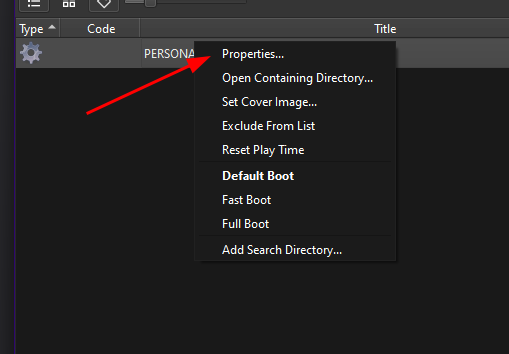
12. If completed correctly you should now have an entry that says something like “PERSONA 3 FES”, right click it, and click “Properties.”
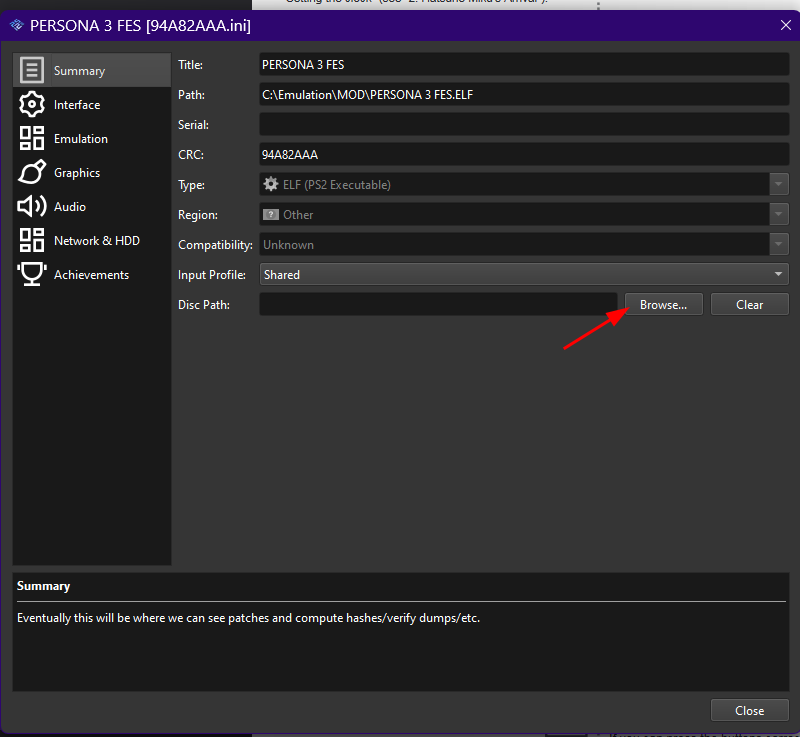
13. Click “Browse…” next to where it says “Disc Path:”
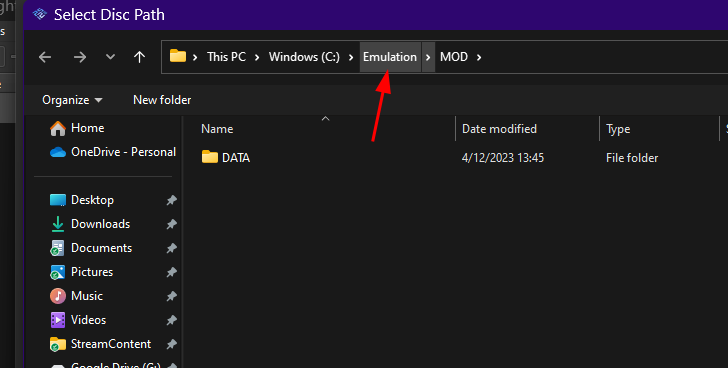
14. Click Emulation in the address bar at the top, then double click ROM, then double click your Persona 3 FES.iso file


15. After that, if you’re running the latest nightly version, click “Cheats” then click “Enable All”. If you’re missing the cheats option on the left, you can ignore this step and continue on.
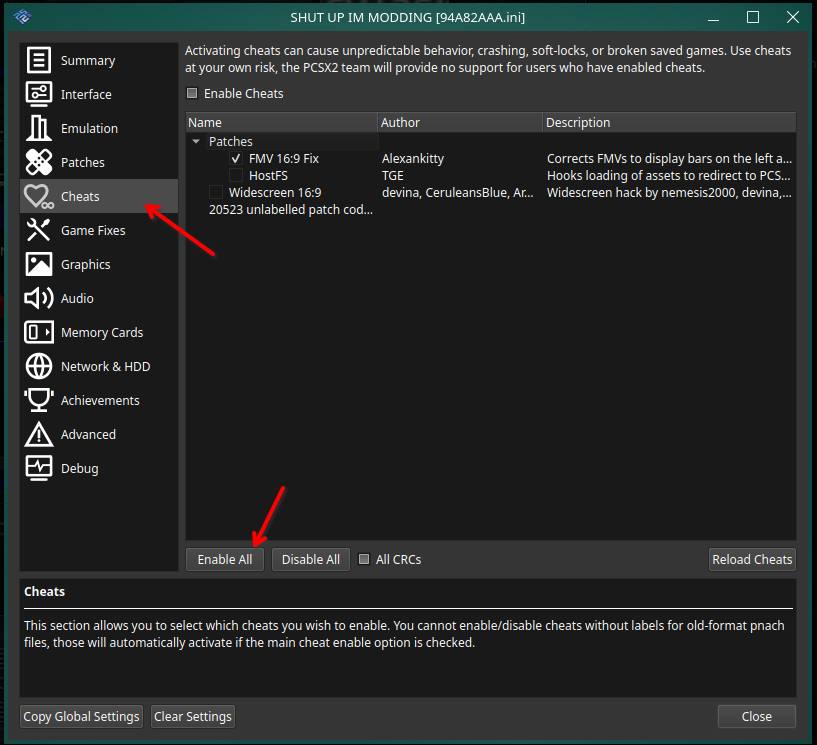
16. Once that’s done, your game properties should look similar to this. Go ahead and click “Close” now.

17. Next click “Settings”, then click “Emulation.”

18. In the window that pops up, click the checkbox next to “Enable Cheats” along with “Enable Host Filesystem” so that they’re both checked like in the screenshot provided below.

19. Next, click on “Graphics.”

20. Set “Renderer” to “Vulkan” if it’s available, or to “Direct3D12”, or 11 if it’s not.
a. Set your adapter to match with your GPU name.
b. Set your Aspect ratio to 4:3 if you want to play in the original aspect ratio, or 16:9 if you want to play in widescreen.
c. FMV Aspect ratio should be set to 4:3, or if you’re using the true widescreen opening from Simply Better FMVs then this should be set to “Widescreen (16:9).”
d. Make sure you keep “Enable Widescreen Patches” unchecked.

21. Next click the “Rendering” tab.
a. Set “Internal Resolution” to either the same approximate size as your display, or to +1x more than it. In this example we’ll assume you’re using a 1920x1080 display, and will recommend you set 4x for Native. If you’re experiencing slowdowns, be sure to decrease this value. If you set it below 2x, you will no longer see an improvement from P3HD.
b. If you’re on an AMD GPU, you also must set “Texture Filtering” to “Bilinear (Forced)” for anyone else it should be set to “Bilinear (PS2)”. The rest of the settings will be up to your preference.

22. Click the “Texture Replacement” tab, the “Search Directory” should be auto populated to “C:\Emulation\PCSX2\Textures” if you followed this guide to a tee, otherwise it will be the textures folder of wherever you placed PCSX2. You should never need to change this option as storing your textures elsewhere is not covered by this guide. Click the “Load Textures” checkbox so that it is checked. “Async Texture Loading” is checked by default.

23. Lastly, click “BIOS” and double check that you have a BIOS properly installed, else it’ll fail to boot. If you have a USA bios showing in your BIOS Selection, you should be all set.

24. Click “Close” in PCSX2 settings.

25. Double click Persona 3 FES in your game list to launch the game.

26. To fix the window size you can either double click the screen to switch to full screen mode, or click “View”, then “Window Size”, then set it to one less than the “Internal Resolution” you picked.

27. Finally, click “Settings”, then “Controllers”, then click “Controller Port 1 DualShock 2.”
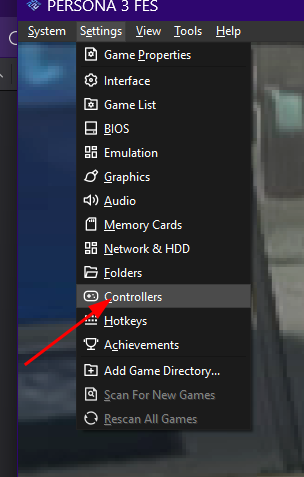
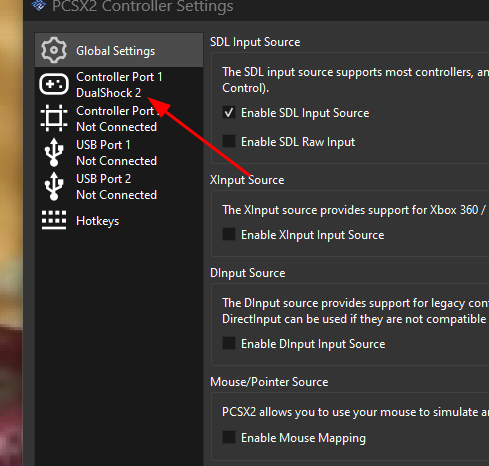
28. If you’re using a controller, you can select “Automatic Mapping”, and then find your controller in the list, if you’re using a keyboard there are some defaults already set, but you can click each button in the window to remap them to how you see fit.


14.2. Adding the game to Steam (Optional)#
1. Open up Steam, then click “ADD A GAME” at the bottom left, then Add a “Non-Steam Game…”
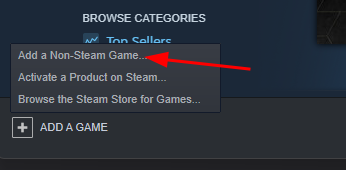
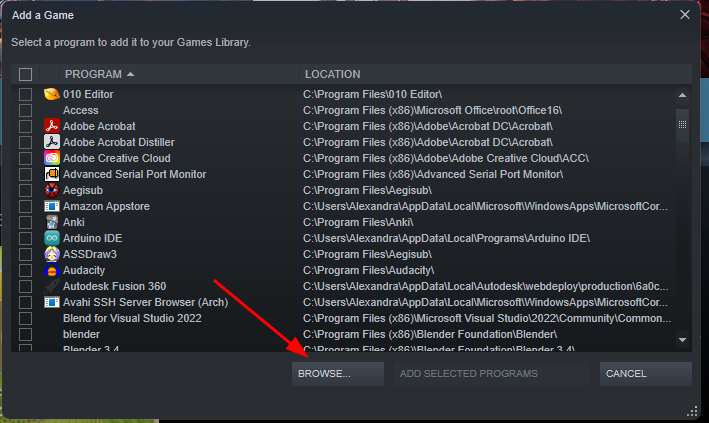
2. In the window that pops up, click “BROWSE…”
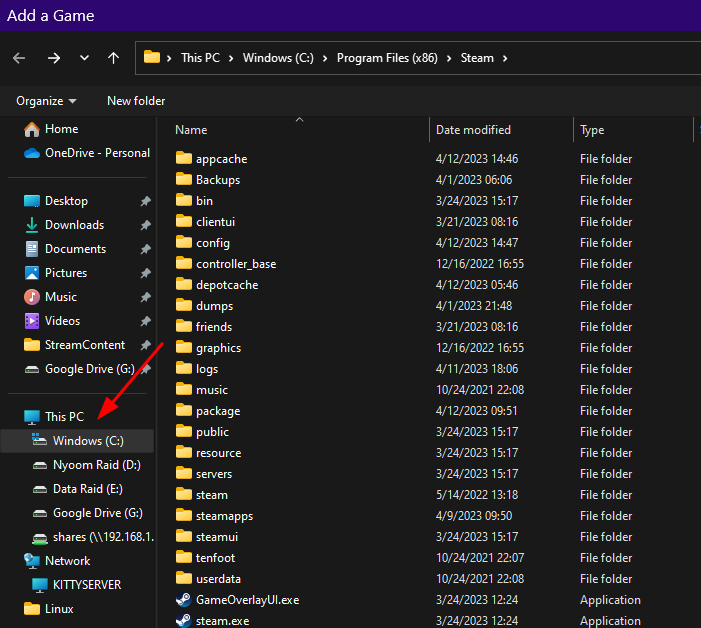
3. Then click This PC on the left
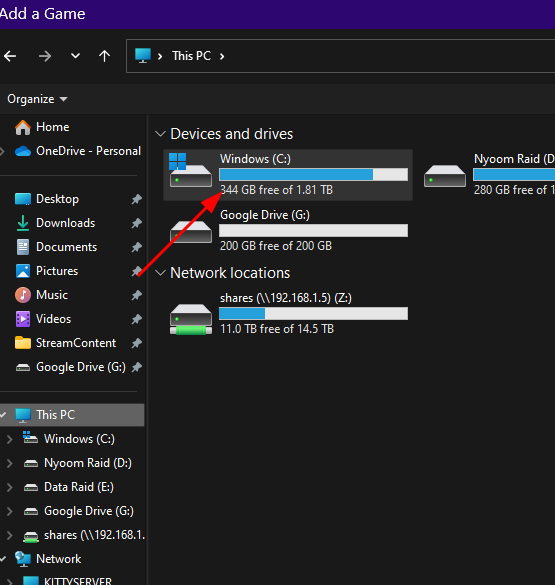
a. Then double click your C drive.
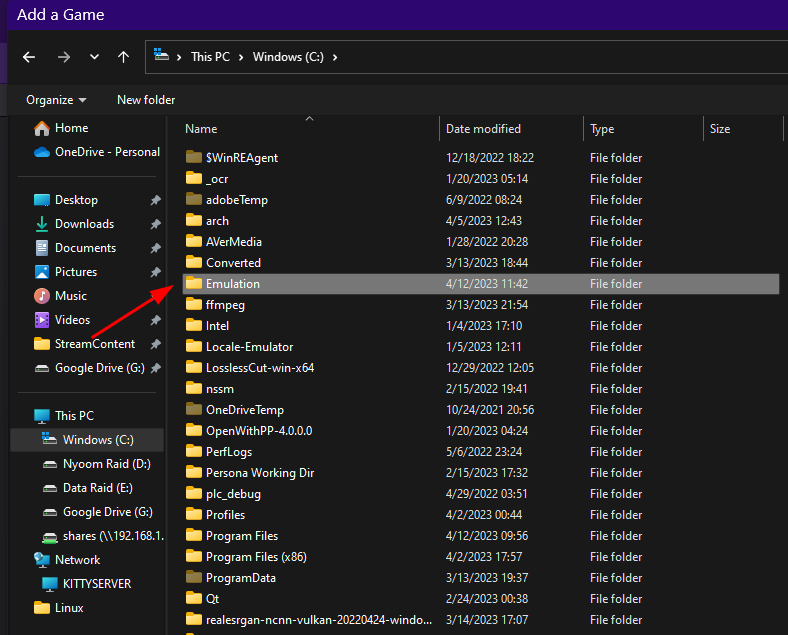
b. Then double click Emulation.
c. Then double click PCSX2.
d. Then double click pcsx2-qt.exe .
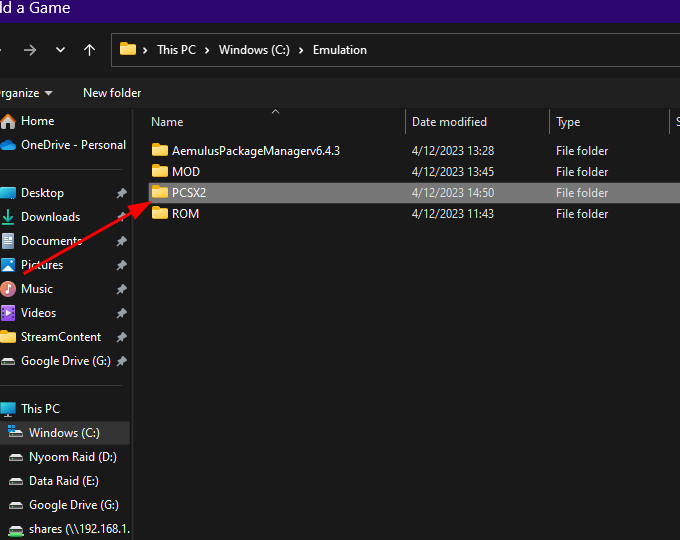
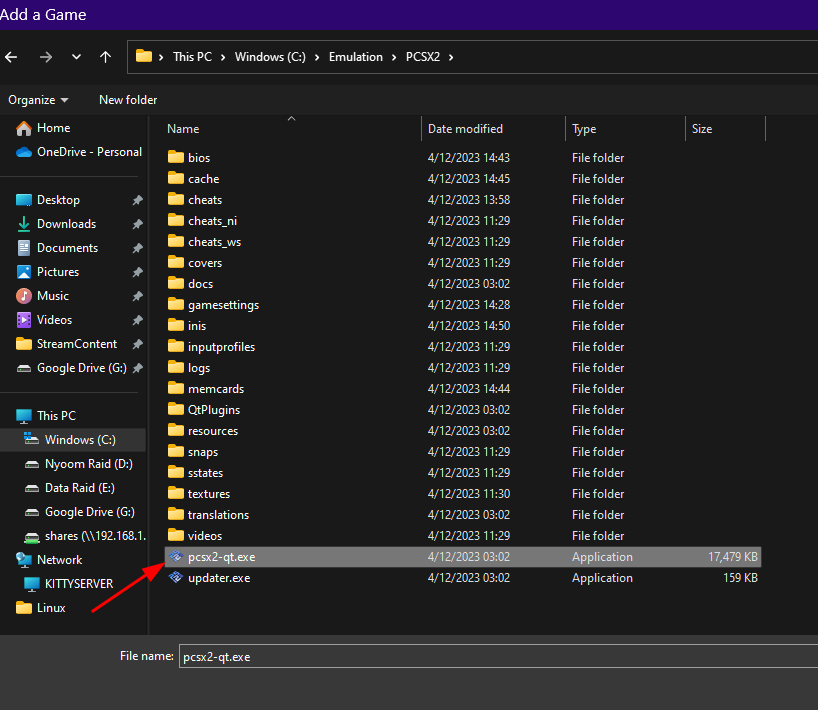
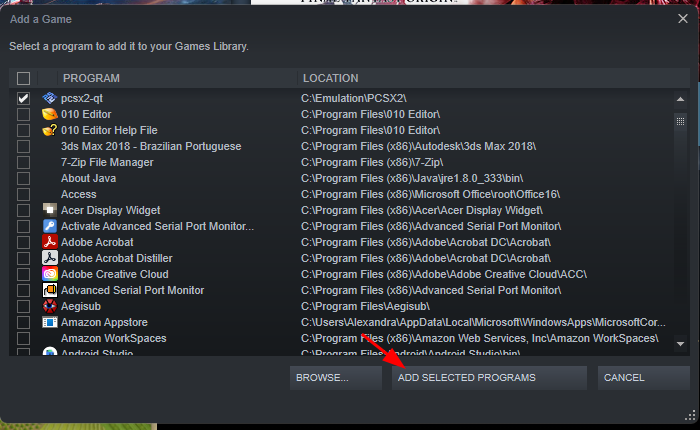
4. You’ll now have a pcsx2-qt item in your list with a check box, click “ADD SELECTED PROGRAMS.”
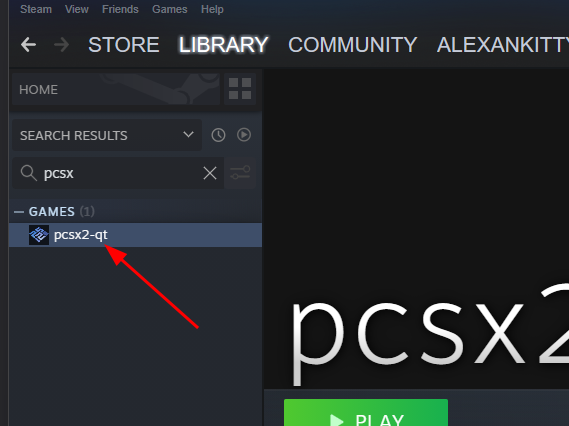
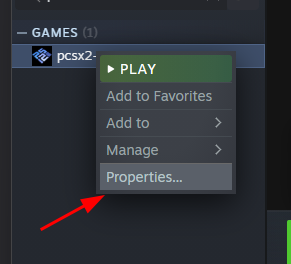
5. Go to your library and find pcsx2, then right click, and click “Properties…”
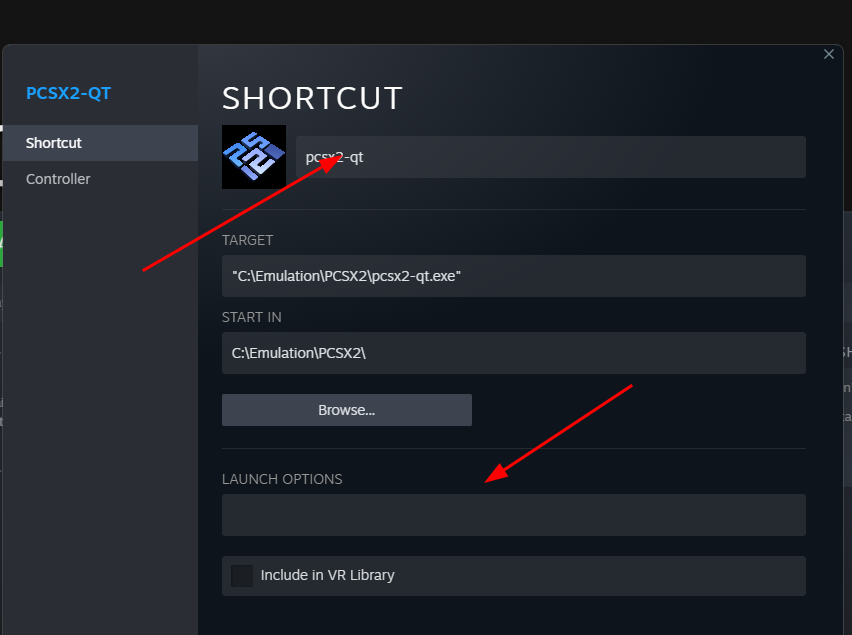
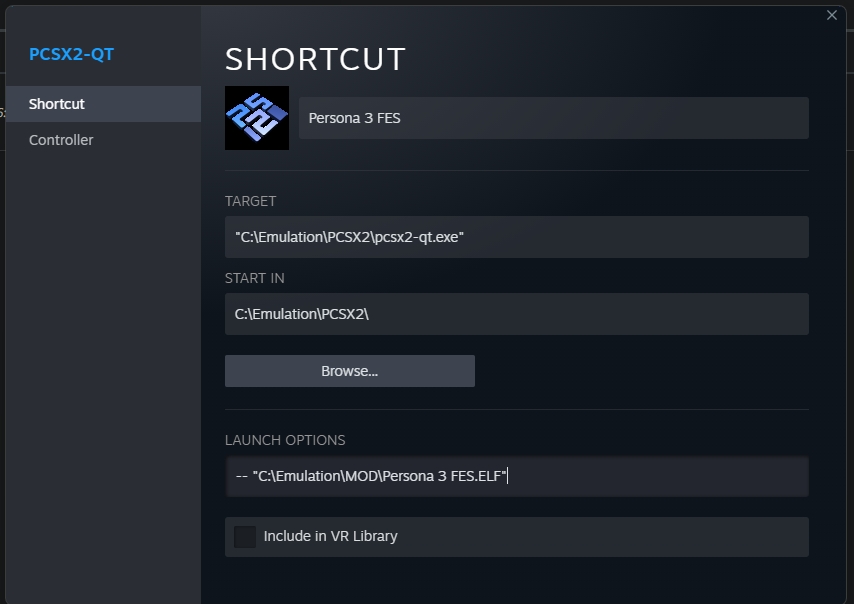
6. Change the name to say Persona 3 FES, and change the launch options to
-- "C:\Emulation\MOD\Persona 3 FES.ELF"(or whatever else you may have named it as)
7. To change the icon, click the PS2 icon, then navigate to an icon of your choosing, for getting an actual icon however, that will be out of the scope of this guide. You can grab a few icons from here. If you want the one this site uses, you can grab it here.

14.3. Installing Aemulus on Linux#
15. Dependencies#
Note
The installer script requires some dependencies to be installed in order for it to run right. Wine depends on lib32, make sure you have your multilib repos enabled, the below are some commands that should get everything working correctly, but you may or may not need more.
16. Arch Linux#
sudo sed -i "/\[multilib\]/,/Include/"'s/^#//' /etc/pacman.conf
sudo pacman -Sy
sudo pacman -S curl wine winetricks p7zip unzip desktop-file-utils lib32-gnutls lib32-gst-plugins-base git
17. Debian/Ubuntu#
dpkg --add-architecture i386
sudo apt install curl wine winetricks p7zip unzip desktop-file-utils gnutls git
18. Fedora#
sudo dnf install curl wine winetricks p7zip unzip desktop-file-utils gnutls gnutls.i686 git
19. Steam Deck and Other Immutable Distros Install#
Clone or click code, then download zip from alexankitty/aemulus-installer-linux.
If you downloaded the source zip, extract it.
Open your terminal and cd to the aemulus-installer-linux folder.
If you downloaded the source zip, run chmod +x AemulusSetupProton.sh.
Run the script with ./AemulusSetupProton.sh.
20. Install#
Run the above command that matches your distro, making any adjustments as needed.
Run the following codeblock to download the installer repo and run the installer.
git clone https://github.com/alexankitty/aemulus-installer-linux
cd aemulus-installer-linux
chmod +x ./AemulusSetup.sh
./AemulusSetup.sh

Once the script has finished running, Aemulus can be opened by navigating to Games > Aemulus Package Manager in your launcher. An example of how this looks in KDE is provided.

20.1. MacOS and Transferring from Different Systems#
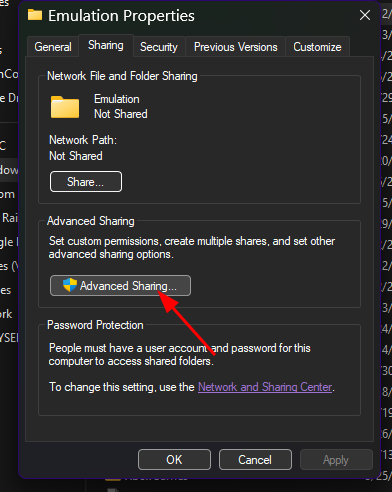
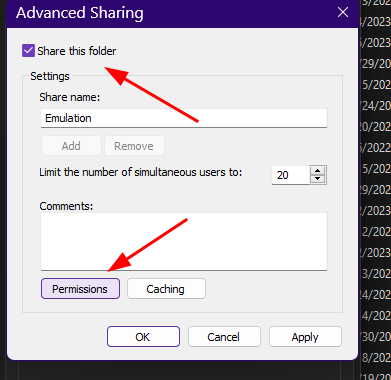
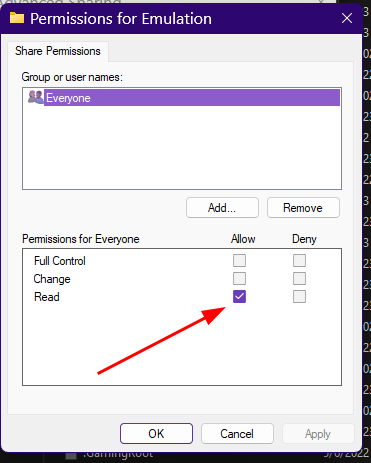
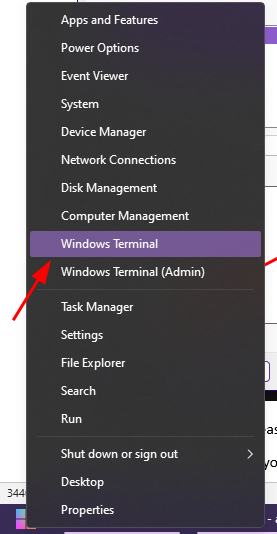
21. Information for VMs#
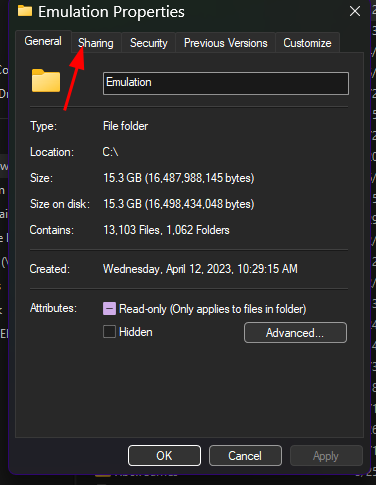
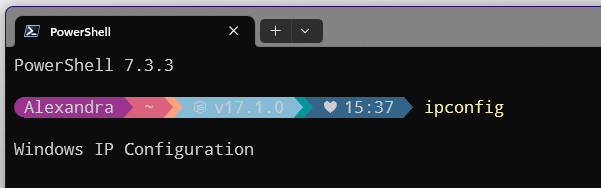
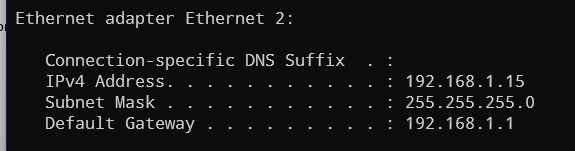
22. Physical Machine#
23. Setting up the files on Linux/Steam Deck/MacOS#
23.1. EmuDeck#
Emulation/roms/ps2. You can
rename the mod folder to anything you want, like P3FES.SLUS_216.21.ELF can be replaced by whatever you named
your ELF file, like Persona 3 FES.ELFEmulation/roms as well./home/deck/.config/PCSX2//home/deck/Emulation/storage/pcsx2//run/media/mmcblk0p1/Emulation/storage/pcsx2/ (Note: mmcblk0p1 may vary depending on the device and partitioning, please double check your emudeck settings)23.2. Using Aemulus with Other Persona Games#
23.3. Troubleshooting#
Note
Under Construction
23.4. Afterword#
Thanks for taking the time to get through this guide. I know it’s quite long and has a lot of information, but I designed it around the idea that anyone could mod the game. If there’s anything that needs to be improved in the guide, please consider joining the P3HD Discord Server or if discord is not your speed, you can shoot me an email at ideas@alexankitty.com.
Happy Modding!